Monday, November 30, 2015

A Cozy Christmas & Flurry of Wishes: Another Snow Globe Card!!

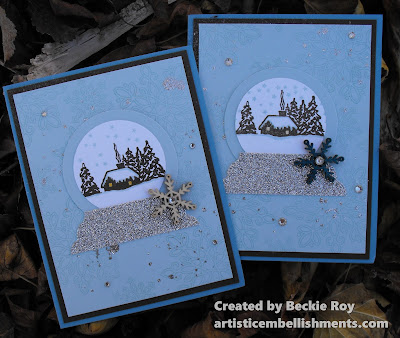
Hello..... I am absolutely smitten with creating these adorable snow globes for my card fronts. The best part is they are super easy to do. I made one a while back, this one is very similar - but I changed a few elements. I still kept used the {Cozy Christmas} to fill in the globe.  Check it out...


My colours are Marina Mist, Early Espresso, Whisper White, Soft Sky & Silver Glimmer Paper. I stamped the background just as before with the {Flurry of Wishes} stamp set. One of my favourite sets from the Holiday Catalogue. I just love the double lined images - very designer! 


I used the {2" Circle & 1-3/4" Circle Punches} to create the "snow globe". Then using the {Lots of Labels Collection Framelits Dies} - I believe I used the 3 smallest die for the base using Silver Glimmer Paper. The great thing is you can get two globes from one die cut. 


I added a {Snowflake Element}, which I totally love the wooden element and you can change the colour simply by tapping  your ink colour of choice over the element - it does appear darker when absorbed into the wood. I used Marina Mist for mine and it appears more like Island Indigo. I still like the look. I added some glitz with some {Silver Stampin' Glitter} using watered down Multi Purpose Glue. You can use an Aqua painter or just a plain paint brush works just fine and splatter your glue. Apply your glitter, tap off the excess - takes a few minutes to dry, you can use a Heat Tool to speed up the process. 


Thursday, November 26, 2015

Howl-o-ween Treat + Wonderland = One Wacky Holiday Card

Hello, so I've got a rather unconventional card to share today. But, I'm so in love with it, probably because it's so fitting with my own style of holiday decorating! Are you intrigued enough?! 

Check it out... I'm calling it "The Hallow-mas Reindeer!"


... Remember it's unconventional! 


Eeeeekkkkk! I just LOVE it so much!!!!! I was trying to use the antlers stamp from the {Wonderland} stamp set... and the light bulb (slightly dim) went off that I could make the skull from {Howl-o-ween Treat} have antlers! I went from there...


I just happened to have some of the {Home for Christmas Enamel Dots} on my stamping desk and decided to make it a reindeer. Now, remember that no reindeer were actually harmed in the making of this hallow-mas card! With a {Spiderweb Doily} as the backdrop for my skull/reindeer, I used the reverse "white" side and distressed it with some black & red inks. I even crumpled and added to rips to really grunge it out! It really added a nice element to my card (I think anyways!).

Still with me?!

Or have I completely weird-ed you out?!!

Halloween is my favourite holiday, and my decor for the occasion stays up all year - even at Christmas. I found some awesome black and white skull ornaments that I could put on a Christmas tree, if I feel so inclined. I'm not a traditionalist let's just say that!


I went with one of my most used stamps {Hardwood} for the red wood grain background - I must say, that I love the red wooden background! With a splash of Cherry Cobbler card stock to keep it all coordinated and some {Black Glimmer Paper} my card is complete!!

So, with all that said - this is sooooo very perfect for me, I understand that it's not for everyone. I'm not sure who I could send this card to, I might have to keep it for myself? I hope you all like it, for its weirdness or not!

Happy Hallow-mas! I think I'm going to Trademark that name :)


Stampin' Up! Supplies Used:
Stamps: Howl-o-ween Treat, Six Sayings (host), Wonderland, Hardwood
Papers: Cherry Cobbler, Whisper White and Basic Black Card Stock; Black Glimmer Paper
Inks: Archival Black Ink, Cherry Cobbler Classic Ink
Accessories: Cherry Cobbler Thick Baker's Twine, Stampin' Dimensionals, Spider Web Doilies, Home for Christmas Enamel Dots, Banner Triple Punch, Boo to You Framelits Dies, Big Shot

Thanks for stopping by, happy stamping!    
Beckie


Wednesday, November 25, 2015

Turquoise Winter Wonderland Mini Treat Bag


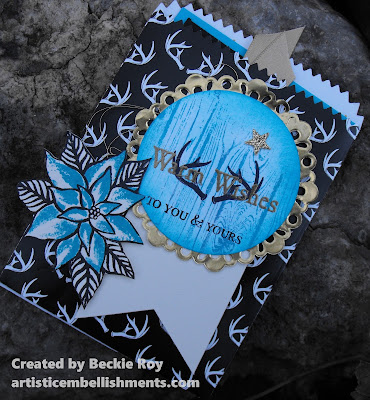
My favourite suite of products from the current Holiday catalogue is {Wonderland}. I am completely obsessed with it. I love the stamp set. The Specialty Designer Series Paper. The Vellum. The embellishments. Well, everything. The only problem was the antlers in the stamp set and paper. I was stumped on what the heck I could use them for. I sat down determined to make something with both the paper and the stamp. I'm sharing what I came up with for both in one project - I did make another with the stamp, but will share that later this week. 


I love that this paper is shiny. Not glittery, but actually shiny. It's pretty stunning paper, even if it does have antlers on it. Now, hunting is definitely not my thing... deer heads, and antlers seem to be all over the holiday decor this year. I went with it and gave it my spin. 


I used the {Mini Treat Bag Thinlits Dies} to create this bag - super easy to make. Then, to dress it up... that was the tricky part. I'm pleased with what I came up with, seems to be fitting with the trends. I kept with a black and white theme with hints of Tempting Turquoise and Gold. I decided to make my treat bag house a little card - cute eh?!


I also added a poinsettia from the {Reason for the Season} stamp set - stamped with Tempting Turquoise Classic Ink to tie in more turquoise colour. 


I used {Hardwood} - the awesome background stamp from the Annual Catalogue to create the background for the antlers. I did sponge it also for a bit more pop.


 I think it makes a super cute card - you could enclose a gift card with it also. Oh, how pretty it would be!!!


 Here's to the unconventional... I hope you like it, have a super day!! 


Stampin' Up! Supplies Used
Stamps: Wonderland; Reason for the Season; Six Sayings (host)
Papers: Winter Wonderland Specialty Designer Series Paper, Whisper White, Tempting Turquoise & Basic Black Card stock. 
Inks: Archival Black Ink; Tempting Turquoise Classic Ink; Versamark
Accessories: Metallic Doilies; Paper Snips; Mini Treat Bag Thinlits Dies; Gold Satin Ribbon; Metallic Gold Thread; Gold Embossing Powder; Heat Tool; Handheld Stapler/Silver Staples; Triple Banner Punch

Thanks for stopping by, happy stamping!    Beckie

Tuesday, November 24, 2015

Age Awareness + Best Thoughts

I decided to pull out some of my stamps from the Annual Catalogue with hopes of creating some birthday cards. I've been so into Halloween and Christmas, I've forgotten about the most common holiday - Birthdays! Everyone has one... 


This card was actually pretty quick to make. I went with a rather off the beaten path in terms of colour combinations (for me at least). I still used Basic Black, as it's a staple for most of my projects - but I used Blackberry Bliss and Cucumber Crush. I like the bold green paired with the rich tone of the blackberry. 


I stamped the large floral image from {Best Thoughts}, which is one of the host/hostess stamp sets from the Annual Stampin' Up! catalogue - my favourite one too. I stamped with Blackberry Bliss Classic Ink onto the Blackberry card stock for a tone-on-tone look - it's subtle, but there.


I decided to add my layers at random, sort of slanted - no rhyme or reason - just how I liked it. I used a piece of Designer Series Paper called {Pretty Petals} paper stack. I had to go with the hexagon page, well... just cause' I love hexagons! 


I stamped the flower onto a piece of Whisper White card stock, also with Blackberry Classic Ink. I flagged the end with the {Banner Triple Punch}. I lined it up with the flower I stamped previously on the Blackberry card stock. Added a butterfly from the same set. Then, stamped the sentiment HAPPY HAPPY BIRTHDAY from {Age Awareness}.


Stampin' Up! Supplies Used:
Stamps: Best Thoughts; Age Awareness
Papers: Cucumber Crush, Blackberry Bliss, Basic Black & Whisper White Card stock; Pretty Petals Designer Series Paper
Inks: Blackberry Bliss and Cucumber Crush Classic Inks
Accessories: Metallic Gold Baker's Twine, Banner Triple Punch, Paper Snips, Stampin' Trimmer, Stampin' Dimensionals


Thanks for stopping by, happy stamping!    Beckie

Monday, November 23, 2015

Wonderland: Glitz & Gold + Online Extravaganza starts TODAY!

Yesterday, was my birthday - and I know they ask if you feel any older, today I actually do! I think it's because I'm over worked and over tired, yup... I'm going with that! Too much work and not enough PLAY is never a good thing! My gift to myself is two weeks off to play! Why thank you, self!

I'm excited to share my card with you today, as I am so please with how it turned out! I'm not one for traditional holiday stuff... so this card is fitting with that. I used Tempting Turquoise & Basic Black - yes, black. I LOVE black and often use it on my projects. It just adds a nice contrast that I love. 

You can check it out below... 


 I used one of my favourite stamp sets from the Holiday Catalogue {Wonderland} and one of my favourites from the Annual Catalogue {Hardwood} to make one in my humble option - pretty cool holiday card.


I cut two Basic Black layers - one stamped with the Hardwood background stamp and popped up on dimensionals on top of the first black layer. I stamped with Whisper White Craft Ink. When using Craft Ink you must remember that it takes longer to dry than regular Classic Ink and smudges quite easily. You can use a heat tool to speed up the process if you're in a hurry. 


I punched out a 2-1/2" Circle with my punch at the top, just eye balling it. You could measure if you really wanted to.


I then stamped the gorgeous Wonderland trees image with Versamark and Gold Stampin' Emboss Powder before heat setting on vellum card stock. I just LOVE Vellum, don't you?!


 I added more gold emboss powder for the sentiment, from the same stamp set! For my finishing details, I added some Golden Glittery stars with Gold Glimmer Paper and some Metallic Gold Thread. Love, love the sparkle and shine! 


Now, to decide who I give this card to... it's always so hard for me to part with some of my cards............ hmmm, I'll have to think about this one ;) I hope you like it, enjoy your day!


Exciting News!!!!!!!!!!! 


Online Extravaganza starts TODAY! Deals up to 50% OFF retail for ONE week only! 24-hour Flash Sales today, Monday, November 23  and next Monday, November 30!!


Thanks for stopping by, happy stamping!     Beckie

Sunday, November 22, 2015

Festive Flower made of Silver & Diamonds

Hello... I have a pretty and very sparkly share today featuring the {Festive Flower Punch} from the Holiday Catalogue. I'm so glad this punch is being carried forward... Yay!!! This share marks my 500th post on this blog and it is my birthday today also. I can't believe that I have shared 500 posts!! Time sure does fly... I'm excited to share this pretty flower with you today. You can check it out below... 


Don't you just love a paper punch? They sure do make projects easier and quicker. I am a sucker for paper punches and the {Festive Flower Punch} is no exception, I love it. I decided to play around with it the other day and make some very sparkly pins/broaches for the upcoming holiday season. 


Because the {Glimmer Paper} is thicker than card stock, it can hold up to being made into a pin/broach without getting creases and tears like card stock might. However, I wouldn't recommend wearing it outside, since it is paper after all. I used {Silver & Dazzling Diamonds Glimmer Paper} to create some of these pins.


When the light hits the dazzling diamonds glimmer paper and shines with so many sparkles, flecks of rainbow shine radiates from it! The photos really don't do it justice to just how sparkly it really is. I added a 2" Circle punch to the back before adhering my pin with hot glue. You think I'd be avoiding glue guns after all the trouble I had making crafts for my work bazaar... I got a third degree burn on my finger (I only burned it 4 times in a row)...ouch! It's starting to peel and I have a nice hole on my finger print now. I guess I'd better stick to the low-temp glue guns from now on right?!


To make the flower look more 3-dimensional, you just score in the center of each of the punched out petals. I used my {Simply Scored} to make the score lines easier. I made the entire flower with dazzling diamonds glimmer paper first, then I added silver glimmer paper to add more colour and sparkle. For the leaves, I added a hint of green colouring to some of the dazzling diamond punch outs with an {Aqua painter} and some Mossy Meadow Classic Ink. I used three of the "x" punches from the flower and a Mossy Meadow {Home for Christmas Enamel Dot}. The entire flower was assembled with hot glue and a Silicone Mat. Super fun right?!


I hope you like it, I made a few of these in different colours. You can change up the colour of the dazzling diamonds glimmer paper so the sky is the limit with colour combinations!

Look what Mother Nature brought me for a present... flurries! I think she thinks it's April Fools?!! On the bright side, it does look pretty around my pin on the fallen leaves though, have a great day :)


Thanks for stopping by, happy stamping!
Beckie

Wednesday, November 18, 2015

Flurry of Wishes


I've got a fun card to share featuring {Flurry of Wishes}. I just love this stamp set. I think the outlines images are so fun and really add a nice pop to your stamping projects, and the fact you can pair it with a coordinating punch is even better! 


I used two shades of purple {Wisteria Wonder & Elegant Eggplant}. Two colours I don't use as often as I should since I do like purple. I saw this type of card on Julie Davison's blog, you can find her easy to follow video HERE. I changed my dimensions slightly so I could have a full sized card front. 


I also used the {Reason for the Season} stamp set for the hidden message. I've made a bunch of this type of card in various colours and they all look awesome! I hope you'll give it a try. 


Thanks for stopping by, happy stamping! 
Beckie

Tuesday, November 17, 2015

Winter Wonderland Bendi Fold Card

Hello... Today, I'm sharing one of the cards we made at last weeks stamp class. The technique is called a "Bendi Fold" card. It looks much more complicated than it is - but I always find it hard to dress it up with out over doing it. I'm happy with how this one turned out. 


I used the stunning Winter Wonderland designer series paper for the background of trees with a base of Whisper White Thick Card stock and two front panels of Garden Green. 


This style of card is perfect for showing off fun die cuts - I chose the Sleigh Ride Edgelits Dies to accentuate mine. I just had to add a bit of shine with some Gold Cording Trim. 


I just love those edgelits, the perfect addition to holiday cards and projects. I am sad that these fab edgelits are not being carried over into the spring catalogue, but that just means more room for "new" stuff! 


For a bit more colour I fussy cut out the poinsettia from the equally as stunning Home for Christmas Designer Series Paper - I love the vintage feel to this paper. Another great thing about this card is that it stands up perfect all on its own and lays flat to mail or store. I tried to make it pretty popped  up and laying flat. I hope you like it, see you soon! 


Thanks for stopping by, happy stamping!
Beckie

Sunday, November 15, 2015

Warm Wishes Panel Card

Finally some time to make a card! We just had our biggest fundraiser of the year at my work yesterday.... I've been working so much, crafting, baking... and I've been sick (luckily all the baking was done before that happened!). I've been told to stay home today and get better - what's better to make one feel better than creating a card?! It's working for me... Check it out below... 


I used the Winter Wishes stamp set (one of my top picks from the Holiday catalogue) - I love the images and they work for more than just Christmas too! I decided to make a panel card - that's what I'm calling it at least!! I used Whisper White and Basic Black card stock - a ruler is a must for this type of card so the spacing isn't too far off. 


I used every image in the set. The first panel I stamped was the snowshoe in Sahara Sand Classic Ink, then the skate with Basic Grey Archival Ink, the ski with Lost Lagoon, the pine sprigs with Mossy Meadow, the pine cones with Early Espresso adding the on top of the sprigs with a dimensional. Lastly, the sled with Cherry Cobber Classic Ink - which I fussy cut out. I added the sentiment from the set, Warm Wishes with Archival Black Ink over top of the Cherry Cobbler inked sled. 


I added some Silver Cording Trim behind the sled to make the pull cord for the sled, just attached it with Snail and some tape to secure - popped it up on dimensionals and ta-da .... my card is done! I can't say enough good things about this stamp set - it's making me feel better already. I hope you like my card, enjoy this gorgeous fall day we're having! 


Thanks for stopping by, happy stamping!
Beckie

Wednesday, November 11, 2015

Lovely as a Tree: Let's Reflect

Hi there, I've only got a few more days until our Annual Christmas Bazaar at my work. It's the biggest fundraiser of the year, sadly it fell on the same day as the first ever Stampin' Up! On Stage Local Event. I'm so bummed that I can't go, but duty calls! I haven't had much "stamping time" lately, since I've been crafting and baking constantly.... hopefully next week I can sit down to make some new stuff. 

Today, I have a card I made a month or so ago, it features one of my all time favourite stamp sets Lovely as a Tree. It's so easy to make fab cards with this fab stamp set, no wonder it has been around so long! I started with a base card of Early Espresso, and a Soft Suede layer that I stamped with Early Espresso Classic Ink and the Hardwood background stamp. 


I love making reflections with this stamp set - hence the reason why I've got one to share, right?! Making a reflection is really easy too. Stamp your image first onto your card stock, then use a piece of window sheet or acetate and stamp with a non-permanent ink onto it - line up the bottom ends. Once it's in place, just rub onto your paper and it will seamlessly fit together to make your reflection. I punched out a 3/4" Circle to use as the mask for the sun. Sponged along the horizon line, added some blue tones for the water and used yellows and oranges for the sky with a bit of Soft Sky to the top. 


To add a bit more dimension to my water, I added lines with a white gel pen. I used the Circles Collection Framelits Dies to cut and mount my reflection piece to my card. I think it really makes it "pop". I hope you like it, have a great one :) 


Thanks for stopping by, happy stamping!
Beckie


LinkWithin

Related Posts Plugin for WordPress, Blogger...