Saturday, October 31, 2015

Brewing up something sweet!

Hello... and Happy Halloween everyone! My favourite holiday...eeeekkkk! I am obsessed with notebooks, I buy at least 2 a week... I have a bunch of these blank ones with a kraft cover. I decided to dress them up for my favourite time of the year! Check it out....


I just love the Happy Haunting Designer Series Paper. The piece I chose has bats... at first glance you may not notice they are bats, but they are. I just loooovvveeeeeeee this paper!


I added a tag to the front with some die cut houses and trees from the Sleigh Ride Edgelits Dies... who says they're just for Christmas?! I sponged the background to  make it look like a night sky. The sentiment is from Sweet Hauntings stamp set.


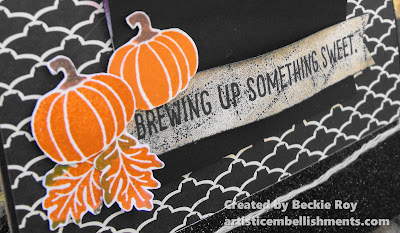
I chose brewing up something sweet.. not like a liquid or sweet like candy, but sweet ideas! That's what I use my notebooks for ideas, sketches, important things... that's why I have so many, I don't want to forget anything and you never know when inspiration will strike. 


The pumpkins and leaves are from the September My Paper Pumpkin Kit. I stamped and fussy cut them out before adding them to the corner of my sentiment banner. Lastly, a distressed piece of Venetian Crochet Trim to the top of my Lots of Labels Framelits Dies.


I'm sad that Halloween is almost over... all the pumpkins, black cats, skeletons, witches, ghosts, zombies... too many good things.. oh and the candy......... ah, so quick to come and leave us... sniff, sniff! I hope you all have a wicked Halloween and eat lots of candy = - ) Don't forget to turn your clocks ahead one hour - ONE glorious extra hour of sleep!!!!!!!!! Cheers and see ya next month. 


Thanks for stopping by, happy stamping!
Beckie


Thursday, October 29, 2015

Howl-o-ween Treat for Sweets!

The Howl-o-ween Treat stamp set went to the top of my wish list when the catalogue became available, mainly because it had a skull image... but all the other images are equally as great. I chose to use the owl image, owls are so popular right now and this little guy is so cute, especially when he dons the witches hat from Boo to You Framelits Dies cut out with Black Glimmer Paper


How cute is this adorable Halloween inspired treat?! I used colours that coordinated with the popcorn - Tangelo Twist, Elegant Eggplant and Old Olive. The owl is stamped with Crumb Cake Classic Ink onto Crumb Cake card stock.


I used Deco Label Framelits to make the tag topper for this yummy popcorn and Sweet Hauntings Designer Series Paper. The owl is attached to a mini paper clip and can be removed from the tag and used for something else after the treat recipient opens it. Who wouldn't reuse this little cutie?! Super cute right? I hope you like it ... have a sweet day!


Thanks for stopping by, happy stamping!
Beckie

Stampin' Up! Supplies Used:Stamps: September My Paper Pumpkin; Howl-o-ween Treat
Papers: Happy Hauntings DSP; Elegant Eggplant, Old Olive, Crumb Cake & Very Vanilla Card stock; Black Glimmer Paper
Inks: Crumb Cake Classic Ink; Archival Basic Black Ink; Crushed Curry Stampin' Write Marker
Accessories: Deco Label Framelits Dies; Boo to You Framelits Dies; Very Vanilla Thick Baker's Twine; Big Shot Die cutting Machine; Stampin' Dimensionals; Glue Dots; 1/8" Handheld Punch; Multipurpose Glue (tombow)

Wednesday, October 28, 2015

Spooky Wishes Among the Branches

Only a few more days until Halloween... sniff! So, I naturally have a Halloween project to share today. I have had so much fun playing with my Halloween products from Stampin' Up! 


I used a bunch of stuff from the Holiday catalogue... the Among the Branches stamp set, the Spiderweb DoiliesBoo to You Framelits Dies, Black Glimmer Paper Winter Wishes. I started with a Rich Razzleberry card base and Basic Black & Pumpkin Pie layers.


The background is double stenciled using the Happy Patterns Decorative Masks. I decided to use the diamond shapes, I used Early Espresso Classic Ink to sponge the diamonds. After I stenciled one layer, I shifted it slightly and sponged again but didn't re-ink so it would look like a shadow to the first ones. I added the spooky eyes from Among the Branches I love that they match the spooky eyes from in the "spooky" sentiment stamp. I hope you like it, I've got another Halloween themed project to share tomorrow!


Thanks for stopping by, happy stamping!
Beckie

Tuesday, October 27, 2015

Sweet Hauntings Mini Treat Pouch

Today, I've got a cute little treat holder to share and it's the perfect size to house a fun sized Halloween treat! You just die cut one of the Square Pillow Box Die cuts and fold the edge up to the score line. I cut the bottom tab off and added adhesive to seal the bottom closed. 


 I used Sweet Hauntings Designer Series Paper to make the treat pouch. I added some die cut houses from the Sleigh Ride Edgelits Dies. I then stamped and cut out the tombstone from Happy Haunting.


I added a partial Spider Web Doily and wrapped some Very Vanilla Thick Baker's Twine around and added a button from the Home for Christmas Designer Buttons - the star worked great. 


Super easy and super cute to make a bunch of pouches quickly. Who says you can't dress up your treats for the trick or treaters. I hope you like it!


Thanks for stopping by, happy stamping!
Beckie

Friday, October 23, 2015

Guy Greetings From Land to Sea: You're My Anchor

In the midst of Halloween, Fall and Christmas cards... I glanced at my stamps and saw one of my favourites from the Annual Catalogue called From Land to Sea. I paused all the craziness going on in my life and just sat down to "play" for me, with no one in particular in mind... just to see where my imagination took me.

I absolutely love the images in this set, from the fish, to the lighthouse and everything in between. I decided to stamp with the swordfish image and make it as though it's swimming up to the surface of the water. Check it out... 


I started by stamping my image once full strength and moving the stamp repeatedly down and to make it as though it's swimming. They also call this motion stamping and works well with cars and boats to appear as though a stationary image is moving on your project. 


I used my Brayer to sponge my background using Island Indigo, Tempting Turquoise and Bermuda Bay Inks. I left the colour a bit lighter in the upper middle section near the fish and I added some Crushed Curry ink. 

I added some flecks of water to make the "bubbles" in the water. The sentiment I chose is from Guy Greetings and it seemed fitting to use you're my anchor with a fishy/nautical themed card. I didn't want to add too many extras, just a simple half strand of Venetian Crochet Trim and snipping it on areas to make it look weathered like it had been outside and fastened the anchor, also from Guy Greetings, colouring it in with Stampin 'Write Markers - Crushed Curry, Sahara Sand & Bermuda Bay. I used layers of Basic Black, and Island Indigo with a Bermuda Bay card base. I hope you like it, enjoy your day :)


Today is the LAST DAY to save 15% OFF on all STAMPS! Excluding Clearance and Hostess/Host Stamps. 


Thanks for stopping by, happy stamping!
Beckie
Thursday, October 22, 2015

Embellished Ornament full of Sleigh Rides and a Winter Wonderland

Hello, I'm taking a break from Halloween.. a small one ;) 

I was asked to design a Christmas/Holiday card for the General Manager of my work. I've been so busy and with the holiday season fast approaching and our Christmas bazaar in sight I thought I'd better get it done sooner rather than later. When I first saw the Winter Wonderland Specialty Designer Series Paper I immediately loved the piece with geometric lines, so I decided to use it as the backdrop for my card. 


I am not one to shy away from using black on any card, even Christmas. It adds a nice contrast with the "pop" of Real Red. I used layers of Real Red, Whisper White and Basic Black with punches of Gold Glimmer Paper and Rhinestone Basic Jewels. 


I even stamped the inside to add a bit of interest to the inside, I just love the Embellished Ornaments stamp set. The images are so stunning and so are the sentiments. 


I used the Circle Collection Framelits Dies to make the focal point background and embossed it with the Softly Falling Textured Impressions Embossing Folder. 


Then added an embellished ornament. First cutting the sleigh and houses, I decided not to use the trees and add some polka dotted designer series paper from Merry Moments paper stack for the upper portion of the ornament. I added an ornament topper made with Black Glimmer Paper and a Gold Cording Trim to tie a double bow and ornament topper attached behind the background layers. I hope she likes the non-traditional colours - I love how this card turned out. If she doesn't like it, I can always make another and keep it for myself! 


Thanks for stopping by, happy stamping!
Beckie

Wednesday, October 21, 2015

Fancy Fry Boxes: Secret Pockets & Double Boxes!

I made this cute treat holder with the Fry Box Bigz Die to make this sweet box. I used the Happy Hauntings Designer Series Paper to make the base for this one, particularly the ghostly ghouls. It looks just like an ordinary fry box die cut right? 


Well, it contains a "secret pocket" to keep the treats all lined up in a pretty little row! I took two of the front panels to make the "secret pocket". I used multi-purpose liquid glue to attach it to the box. Which, coincidentally housed a Reese's Peanut Butter Cup just perfect!  


My second box is FaBOOlous! It's two boxes in one. I die cut two boxes and attached at the top, since the box is curved - I added a side panel to keep it together. 


These fry boxes actually hold a lot of stuff. Check it out... yep, 4 mini candy bars and 3 Reese Peanut Butter Cup singles! That's 7 candy bars...


These treat boxes would be great for so many different occasions other than my favourite, Halloween. I used Go Wild Designer Series Paper Stack to add a bit of colour to the front, back and side panels for the box. 


 You can see some of the previous boxes I made in the last few shares, which one is your favourite? 


Thanks for stopping by, happy stamping!
Beckie

Monday, October 19, 2015

Baker's Boxes all Decked out for Halloween Treats & 15% OFF Stamps starts Today!

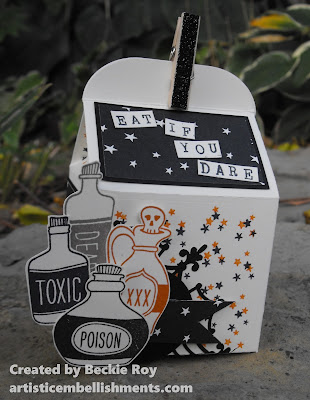
Hello. I've been on this "box" kick lately! This time, I took the Baker's Box Thinlits Dies a spin.  I just LOVE this box, and it's larger than I thought. You could fit some nice treats inside, even cookies! I can't wait to make more of these to give gifts this upcoming holiday season. But, before I even think about Christmas gifts - I want to share some I made for my favourite holiday, Halloween. 


The box I designed features a base of Very Vanilla card stock with some stamping with the stars image from the Jingle All the Way stamp set with Archival Black ink and Tangelo Twist Classic Ink. 


I used the Happy Hauntings Designer Series Paper to add even more stars to my box, matted onto Basic Black card stock. To dress up the front, I added some images from Sweet Hauntings and a Spider Web Doily, which I cut into quarters. Don't you just love those doilies?! I sure do.  


Well, I've got a second box to share today. This time I started with a Whisper White box base. I stamped the entire piece, before assembling with Gorgeous Grunge and Howl-o-ween Treat stamps. I sponged the edges of the box with Early Espresso Ink and pounced my sponge to distress the box even further. 


I punched a 1-3/4" Circle from the polka dotted paper in Happy Hauntings Designer Series Paper. I attached it to another quarter piece of a Spider Web Doily. I stamped the tombstone with the Happy Happy Halloween, but added a Real Red banner with the center sentiment to give a bit more of a pop to the front. 


I used my bone folder to make the banner curved and secured the end in place with a Stampin' Dimensional. 


I hope you like these super cute boxes, I'm sure I will have more fun with the Baker's Box Thinlits Dies in the future! Have a great day! 


Stampin' Up! has an awesome special... 15% OFF all stamps! Only for ONE week. 


Thanks for stopping by, happy stamping!
Beckie

Stampin' Up! Supplies Used:
Stamps: Sweet Hauntings; Alphabet Rotary Stamp; Howl-o-ween Treat; Gorgeous Grunge; Jingle All the Way
Papers: Very Vanilla Card stock; Whisper White Thick Card Stock; Real Red Card Stock; Basic Black Card Stock; Happy Haunting Designer Series Paper; 
Inks: Archival Basic Black Ink; Tangelo Twist & Real Red Classic Ink
Accessories:  Baker's Box Thinlits Dies; Big Shot Die cutting machine; Spiderweb Doilies; Stampin' Sponges; Stampin' Dimensionals; Paper Snips; Mini Clothespins; 1-3/4" Circle Punch; Handheld Stapler; Silver Mini Staples

Friday, October 16, 2015

4-Sided Fry Box is Hauntingly Sweet!

Hello stamping friends! I had fun playing with the Fry Box Bigz Die.  I wanted to try to make a 4-sided box, it was easier than I had originally thought it was. I started by die cutting 4 of the die cuts. Cutting the front (smaller portion) of the die off. 


I scored just above the score line that the die makes to make the bottom of the box flat and not curved. I did cut a square to cover up the bottom and secure it in place so the candy I was adding won't fall out. I added on on the inside also. 


I then added a 1" handle to my box that would eventually house some tasty sour kids jelly beans... yummy and sour!! I added some Winter Wonderland Specialty Designer Series Paper to decorate my box along with some fun die cuts from the Howl-o-ween Treat with the Boo to You Framelits Dies. The sentiment and bottles are stamped with Sweet Hauntings. 


I couldn't resist adding the skull die cut with a witches hat to the front of this box, complete with Black Glimmery Eyes! Super cute right?! To assemble the box, I did cut a good portion of the tabs off so they didn't stick out too much. I hope you like it, if you have any questions - please leave me a comment. 


Thanks for stopping by, happy stamping!
Beckie


Tuesday, October 13, 2015

Brick Wall & Best Thoughts

Hello stamping friends! I made this card a while back and realized I forgot to share it. I used my favourite hostess/host stamp set called Best Thoughts. I just love the Rhododendron flower. I decided to stamp on vellum card stock and colour with Mint Macaron ink a Blender pen. I went for a non-traditional flower colour with green tones... but I like how it turned out.


I die cut an oval in the center of a Brick Wall embossed Cucumber Crush layer. I did add some sponging to give more depth to the brick. The flowers have Rhinestone centers and a piece of Silver Metallic Baker's Twine and a Happy Birthday sentiment. You can tell I made this a while back based on the flowers still in bloom, sadly my garden is almost in hibernation for the fast approaching winter season. I hope you like my card!


Thanks for stopping by, happy stamping!
Beckie

Monday, October 12, 2015

Embellished Ornament... Ornament!

I was playing with the Embellished Ornaments stamp set and Delicate Ornaments Thinlits Dies. I wanted to try to make an ornament. A couple of years ago, Stampin' Up! had a stunning ornament on the cover of the Holiday Catalogue. Now, the ornament stamps were a lot smaller than the one's offered currently - so I could only add four... it just didn't look right with five!


This was my first attempt at making one of these. I started by stamping several of the shorter ornament and die cutting them out. I stamped 12, and die cut them out - then die cut 4 without stamping for the base (back). I plan on using this for a package topper so it's okay to have it blank. You could stamp the back if you wanted.


I used Always Artichoke Classic Ink for my stamping. I used the Festive Flower Builder Punch to make the center of the ornament with Always Artichoke and Crushed Curry Card stock, also my first time using the punch. I punched 12 of the larger and smaller petals and scored 8 them in half. 


I used the double petal image for the center flower (crushed curry) punching 4 times and scoring all 4 in half. Lastly, 3 of the flower center pieces with a rhinestone in the center. I used the Silicon Gel Mat and a glue gun to assemble. I punched a hole in the top of one of the ornament petals and threaded some Old Olive Baker's Twine through so I could hang it! Not bad for my first attempt, I hope you like it... if you have any questions, please let me know! 


Thanks for stopping by, happy stamping!
Beckie

LinkWithin

Related Posts Plugin for WordPress, Blogger...